Saturday, August 28, 2010

Lookie What We Got!

Our first wedding gift arrived yesterday! I came home from work to find this on the porch:


What could be inside?


It appears to be full of plastic-wrapped air.


Little Girl Kittie thought this part was fascinating. I felt like I was doing a magic trick-- I kept pulling and pulling and the little air pillows just kept coming and coming.


But wait! There are gifts to be had! YAY!


And here they are, new, beautiful, and ready for cookin'. Two Calphalon pans and an eight-cup Pyrex measuring cup. Thanks S.'s aunt and uncle!

However, this leaves us with a dilemma-- help me out! Should we send a thank-you card now, or wait until after the wedding?

Wednesday, August 25, 2010

As if you aren't sick enough of hearing about our wedding bands...


I found my second band! On eBay!

See, after my original post about my bands, I learned about palladium. Palladium is in the same family of metals as platinum, in that it's hypo-allergenic, but it's about the same price as white gold. Boy how I wish I had known this earlier.

Armed with a new goal, I went searching for my spare band. If you remember correctly, I was interested in bands like these, from www.applesofgold.com:


(This one wasn't actually on my original post as it's too expensive, but just look at it! Gorgeous!)

Except these all only come in gold or platinum.

Finding a palladium ring online carved with a floral or paisley design and under my budget of $400 seemed hopeless. I searched everywhere I could think of-- even Etsy. It appears very few jewelers work with palladium yet, and therefore the options for a more intricate design were limited.

But then-- then!-- I got the brilliant idea to check eBay. And there she was, in all her glory, just a few rings down in the search results.


The ring was $380, but the seller had a "Make an Offer" button. I figured it couldn't hurt so I did-- and he accepted my offer!

Now, to be completely honest, I usually stay away from eBay. I've heard too many horror stories about things not being what they appear, or as advertised. But this was a completely wonderful experience, and I couldn't be happier with the results. Once my offer was accepted (the same day), I received an email from the seller stating that it would take about two weeks to make my ring and then another week to ship it to me.

It was in my hands twelve days later. Check it out!


It came in this cute little box. I untied the ribbon and. . .


Found another box! My little ring was nestled within (sorry no picture of that step, I was too excited!)


And here it is! (On my index finger as the fit is a little tight since it's so hot right now, and I'm paranoid of getting it stuck).


Aaaaaand once more, all together with feeling! I'm so glad our little collection is complete and I'm all set for rings for the next century or so. I think.

Kidding.

Mostly.

Was it a trial to find your wedding ring?

*All unsourced photos belong to me.

Monday, August 23, 2010

Licensed, and Getting A Little Serious

Today S. and I took long lunches and headed downtown to the county recorder's office to get our marriage license!

The building is right on the bay, so after we checked in and were told to go wait by the windows, we were pleasantly surprised to see cute little two-person benches, and a gorgeous view to watch as we waited for our turn.


(Dark, crappy cell phone pic but I think you get the idea)

We spent the time giggling about various inside jokes and the "Wedding Packages" offered on a little laminated sign at the empty station in front of us. We joked that we should buy the available $10 sterling silver wedding bands and go freak out all of our co-workers.

The lady called our name after about ten minutes, and another ten minutes after that we handed over $50.00 and were on our way. Super, super easy and so quick that we had time to grab a bite to eat in the building's cafeteria:


(Our shared caesar wrap, which had rice in it and was warm. I thought this was odd but it was tasty, so whatever. Also a white chocolate macadamia nut cookie for dessert, and our brand spankin' new marriage license in its pretty envelope in the background!)

Painless, easy, and quick, and all it took was a form, an hour, $50.00, and a government-issued photo I.D.

Which brings me to the serious part.

It's ridiculous to me that just because I'm straight, I can walk into the county building and walk out forty minutes later with the California government's permission to marry. However, if my soul mate happened to be a woman, forget it. I won't get into the semantics here, because I don't feel qualified to, but I do know that Miss Stripes had a lovely post putting her feelings into words better than I ever could, and I do know that denying any human the rights available to another is just plain wrong, no matter what your belief system or orientation.

Here's hoping that someday soon, all those who wish to marry can do so as easily as me and my fiance, without great strife, struggle or heartbreak.

Saturday, August 21, 2010

The One Ring (For Now)

S. and I have very different opinions about our wedding rings. Obviously, I'm a little neurotic about mine, whereas for him, the decision was pretty simple. For me, the ring(s) that S. puts on my finger on our wedding day are the ring(s) that I want to wear for the rest of my life. For him, a cheap, durable, easily-replaceable ring was a must, in case of an accident or loss.

So the hunt was on.

At first, we both really liked this titanium ring, with a carbon fiber inlay, from Zales (though quite frankly, you can find it quite a bit cheaper elsewhere online):

I'll be honest, I liked this ring a lot (and still do) because of the carbon fiber. S. and I share a passion for cars, after all, so it seemed like a solid contender. But my fiance is nothing if not diligent (I leave it up to him to research all major purchases because he's so good at it!), and his searching turned up the fact that the carbon fiber in these rings is softer than the metal and can scratch or fray. So, this one was out.

After visiting Zales in person a couple of times, and looking around online, the mister decided he wanted either titanium or tungsten, which he then narrowed down to tungsten carbide. Tungsten carbide is extremely damage resistant, and will still look new for many years to come. The only real downside is that it can't be re-sized.

With the metal selected, he just needed to find a ring. Enter www.sparklecartel.com, which features a new piece of jewelry at a discounted price until it sells out (usually about one per day). S. watched the website for a few days until a tungsten ring came up that he liked and that was it! Easy as pie. The best part? It was only $26.00, so if he does need to get another one someday, no big deal.

So are you ready to see his ring? It's very shiny, and we all know how I feel about shiny things!


(Personal photo)

Aww, our rings are so cute together!

How does your fiance feel about his wedding band?

Thursday, August 19, 2010

A Fairytale (Pumpkin) Wedding


This project is very dear to my heart, so I hope you'll forgive the length of this post!

In early May, S. and I were at a local nursery picking up some hanging flowers for my mom for Mother's Day. I always get a little excited around plants; I love greenery and lush growth and have regular fantasies of working in my own garden, making dinner with vegetables I grew myself, and just being all-around horticulturally-capable.

Except that my past is rather checkered when it comes to plant life. As a child, my mom made several attempts to get me to respect and appreciate plants by giving me my very own to care for. It started with a pack of marigold seeds that I planted behind our house in Michigan. They sprouted, grew, blossomed-- and then our dog dug them up.

After we moved to California, I had an interest in the new, unusual-looking desert plants that are so common out here, specifically cacti. So one day I picked one out at a nursery and we brought it home. I named it Junior because it was so tiny, and I put him in the windowsill of my room and watched him slowly expand in size.

Junior-- a cactus, remember-- acquired a severe sunburn and died.

Thus it was with well-earned trepidation that I had long ago decided to stay away from plants requiring more than the occasional dusting. Except that last year, we bought a house with a yard. A blank canvas. And I had already slipped up and let myself buy three queen palms and a hibiscus plant.


Our palms, while still alive a year later, do not appear to have grown an inch.

So when we made the trek to the nursery, I frolicked among the rows upon rows of little seedlings, lush ground covers, and potted trees, and visions of sugar snap peas and strawberries danced in my head.

I thank my stars every day that S. puts up with me, because by the time we'd picked out my mom's hanging plants, I had a plan. A plan that was only exacerbated by the large number of seed packets covering an entire wall in the nursery's office. Including pumpkin seeds.

One of the big troubles I'd been having with planning our wedding up until that point was that I'd been doing all my planning in the spring. Which meant that all of my inspiration was for a spring wedding. When my eyes lit on that little tiny seed packet full of pumpkin potential, a light bulb went off. Of course! A fall wedding has to have pumpkins! Why not grow them myself?

Looking back now, this was absolutely insane to try.

But we picked up some seeds and some compost along with my mom's plants, and went on our way. (I also couldn't resist buying eighteen strawberry plant seedlings). I did some calculations and as far as I could tell, we needed to get these babies in the ground in order to have pumpkins in time for the wedding! So that weekend, we tore up a corner of our yard, and mulched, and composted, and planted, and watered. And waited.

It took a couple weeks of daily watering-but-not-overwatering, and holding my breath, but then magic started to happen:


The first two rows are white pumpkin vines, the back two are fairytale pumpkin vines, and waaaay in the back you can see my two rows of strawberry plants.


Flowers grew, then bloomed and closed all in one day. I spent many an early morning with a bamboo skewer, going from flower to flower trying to pollinate them all. Yeah.


Then the bases of the flowers bulged out and baby pumpkins started to form! The flowers wilted and shrunk, and the ball settled down on the vine until it touched the ground. At this point, I put pine shavings (the kind that I use for my horse) under each one to minimize the amount of scratches and dirt they would suffer while they grew.

A couple weeks ago, my oldest vines started dying, even though my pumpkins aren't fully mature yet. But they're big enough, and orange enough, that I will still use them for my wedding. Now to just find someplace cool and dry to store them until October!

This hasn't been a total success. As I said, mine are still sort of small, and this is what a fairytale pumpkin is supposed to look like:


These are the three biggest fairytale pumpkins I have:


Photobucket

Photobucket

Photobucket

The middle one is still growing, so it might get the signature color the other two are missing.

And this is my largest white pumpkin:


All told, I hope to have at least 8-10 pumpkins for our wedding that I've grown myself. I've already decided I'm not going to cry if it doesn't work out, because at least I tried. And the fact that I've come this far has been not only amazingly rewarding, but really fun, too!

Are you home-growing anything for your wedding?


(All photos not sourced belong to me)

Wednesday, August 18, 2010

Dancin' Shoes, or, How A Total Stranger Made Me Cry Over My Wedding For The First Time

So... remember why I'm wearing cowboy boots under my wedding dress? These cowboy boots, in fact?


Source

Yeah. My lovely, gorgeous boots. They go with NOTHING else about my wedding day, but as I approach the one-year anniversary of the day I lost my little girl, I am even more determined to wear them.

Except there's a problem. Since it's getting closer to the wedding, I decided that I would start wearing them to break them in. So, last Wednesday evening, I did. They rubbed a little bit on the inside of my ankles, but nothing major, I thought. Until I got home and got in the shower.

Then the burning started-- the horrible, awful burning! It felt like someone was holding a torch to the insides of my ankles as the water streamed down them, and I hadn't even touched the soap yet. I distinctly remember some very un-lady-like obscenities coming out in surprise. Luckily, the only one around to hear was my cat.

Today, a week later, I still have bright red scabs on both ankles, and I only had the boots on for about an hour. Clearly, these boots aren't going to work for the whole wedding night. I refuse to not wear them for the ceremony, but I'll need something else for the reception, when I most certainly will be dancing it up and moving around a lot.

What's a girl to do then? Why, buy a second pair of shoes, of course!

I have to admit-- I am in love with shoes like these:


Source


But I can never wear these teetering, towering heels thanks to a weak right knee. And my wedding day is definitely NOT the day I want to re-injure it. So, I have to play it safe with wider heels (which is reason #2,694 that my boots were perfect. Sigh).

I went shopping Monday night with my hand clenched around my wallet (because money is starting to get really tight as we get closer to the wedding, and my spending has been a little out of control lately). Ultimately, I wanted a cheap, comfortable pair of cute shoes with a wide heel (heel required so my dress is the right length, since we measured it with my cowboy boots). Preferably in white. I headed to the usual contenders: Payless Shoe Source, Famous Footwear, even Target and Wal-Mart. No luck.

In between all of these stores in the mall is a dance wear store. The thought passed through my mind that since I'm looking for shoes I can dance in, why not try dancing shoes? I ventured into the dance store after my first failed foray into Payless (ha! How's that for an alliteration?), only to discover that they had a pair of practice ballroom shoes (read: wide heels and comfy) on sale for $23.99. Except they were black, they ONLY came in black, and they were really kind of ugly.

There was a pair of white shoes on the wall, but they were $62.00, which was a little too steep for my budget.

So I kept looking, weaving in and out of every shoe store in the mall, wringing my metaphorical hands. I dipped back into the dance store to stare at the nice expensive leather shoes and the poor, ugly practice shoes no less than twice, asking each time if the white ones were going to be on sale, or if the black ones really didn't come in any other color, before going to sit outside and call S. in meltdown mode. Our conversation went something like this:

Me: I like the white ones, but they're not on sale, and I don't want to wear black shoes on my wedding day!

Him (thinking: why are you calling me?): I don't really know what to say, honey. Might be worth it just to get the white ones.

Me (after hemming and hawing for another five minutes): Okay, then. See you soon.

I went back into the dance store (again), where the sales girl probably thought I was nuts. I stared at the wall for another minute, then finally turned and asked if the white ones came in an 8.5. Luckily, they did, or I might have blown a gasket.

I tried them on, asked some questions about the fit and explained what I needed them for, eyed the super-flashy Latin ballroom shoes out of the corner of my eye for a minute, then said, "I'll take them."

I decided to wear them out, since I wanted to see how comfortable they really were and I still had to walk all the way back across the mall. The girl started to write up my purchase and said, "Okay, I'll give them to you for the sale price [of the black shoes], since it's for your wedding."

!!!!

I about had a heart attack of joy right then and there! I was floating for that whole walk back across the mall, and let me tell you-- these are the most comfortable heels I have EVER worn! I can walk completely normally in them, which means dancing should be a breeze, too. I was so happy, in fact, that I teared up as I called S. to tell him that the problem had solved itself.

And that's how a stranger made my cry about my wedding, but they were tears of joy.

Want to see my perfect new shoes? They are just plain white leather, and I'm thinking that depending on my project load as the wedding gets closer, I may want to fancy them up a little. But here they are!


(In case you're wondering what the heck I'm standing on, I actually have my feet up on the wall-- my previous attempts against the dark carpet made my feet indistinguishable from the shoes. Thanks, skin. Thanks).


(All un-sourced photos are personal pictures)

Have you had any good luck and kindness from strangers because of your wedding?

Monday, August 16, 2010

Sort Of According To Plan

Saturday was a very busy wedding day. We mailed our invites as soon as the post office opened in the morning, and after some other obligations, I met up with my mom in the afternoon for my hair and makeup trial. Julie, my stylist, was recommended to me by BM K. She was an absolute sweetie and very thorough. She really tried to understand what I wanted from my hair, and did her best based on my inspiration pics:


However, I think I've come to the conclusion that my hair is never going to do what I want it to.

Here's my before shot, taken by S. outside just before I left for my appointment (you can see our brand new windows there behind me, our wedding gift from Mom and Dad R.!):


My hair is getting so long! It's almost down to my waist in the back. I have to admit, while I've always had long hair, this is the longest it's been in quite some time and I am so anxious for my post-wedding chop. Anxious enough, in fact, that after my results from Saturday, I might be doing a pre-wedding chop-- at least a tiny one.

Here's the back of my hair afterward. It's not as full and lively as I'd like, but I'm thinking it's the best I'll be able to get with my thin, fine hair. This is part of the reason why I want to cut some length off before the wedding-- it's too long, and the curls start about a third of the way down, instead of going all the way to the crown of my head like all my inspiration pics.


And from the side:


And last but not least, my makeup trial and hair from the front:


I love the makeup. Julie has a similar complexion to me, and she suggested not doing heavy foundation or cover-up, which I ended up really appreciating. It wasn't until she said something that I realized that's exactly why I'm orange in every other picture where I've had my makeup professionally done! (Can you tell I'm more of a put-some-eyeshadow-on-for-fancy-occasions-and-call-it-a-day kind of girl?)

I felt like it needed something else, though (hair flower aside, which I forgot to bring with me anyway). And I have to admit that I've been eying some pretty fancy headpieces (like those by the lovely Mrs. Star!) for a while. I'm also not very patient, so I headed on over to Claire's and got some sparkly headbands to wear while I had my hair styled.


These totally added the feeling I was missing. I hope that between the headbands and the haircut, I can hopefully have more fun and fullness the day of!

After we got my headbands, we headed over to Frederick's of Hollywood to look at corsets, but that's a post for another day.

What do you think? Any suggestions for thin, fine hair in a curly, half-up hairdo?

(All photos not sourced are personal photos).

Friday, August 13, 2010

A Flower For The Moms, Part I

In case you don't remember, I'm doing my own flowers. Why not? It worked out for Sister A., and it was actually a really fun activity for us girls to do the day before the wedding. It was a nice calm amongst the chaos, and I'm really looking forward to sitting down with my girls and building our bouquets together.

My sister did buy custom corsages for the moms, though. I was prepared to do this, too, until I saw Miss Earrings' great post about fake flower corsages, and the light bulb was on.

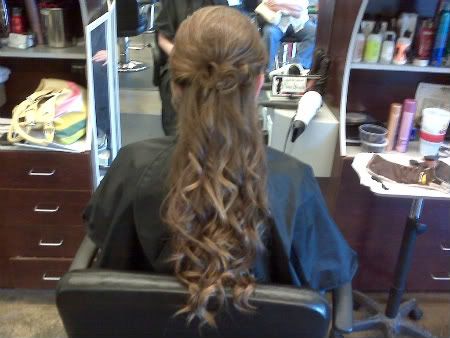
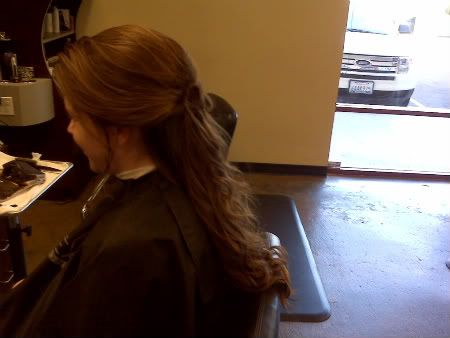
I've already made my hair flower, so corsages should be a snap. And they were! I've decided to post how I did it even though it's not that different from a hair flower, just to give you an idea of my methods.

This post is just about the de-construction and re-construction. I'll show how to make the wrist loop in another post.

You'll need:

-Fake flower of your choice
-Hot glue gun
-Heavy duty wire cutters
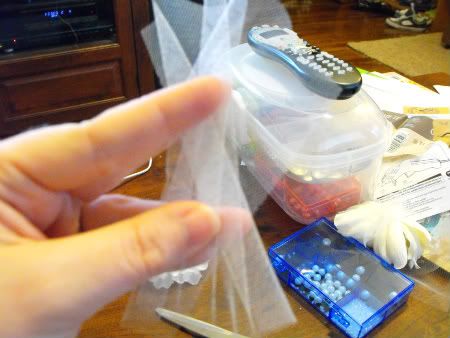
-Tulle scraps, I used a roll I got at Michael's in the wedding section in ivory
-Pearls or beads for the center

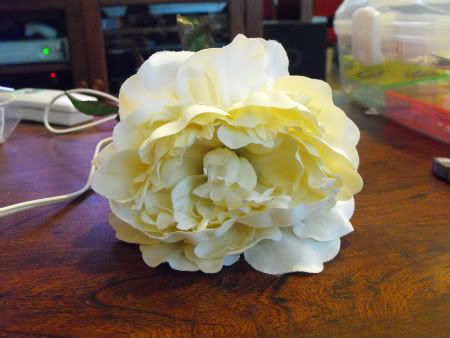
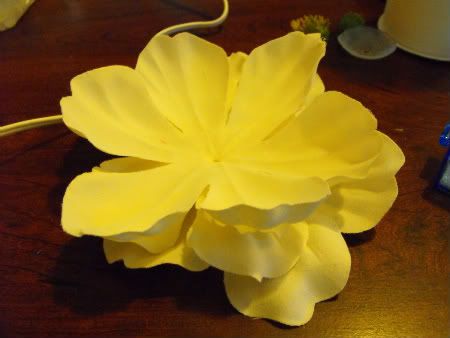
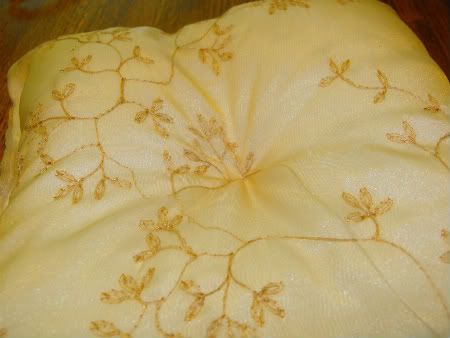
I scoured the fake florals in Michael's for what felt like hours until I found a good candidate. A big, poofy flower? Check.


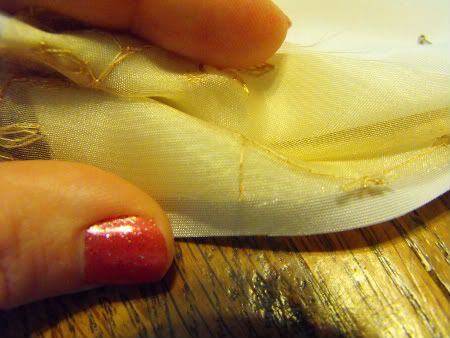
You'll need to cut the flower off of the stem pretty close to the hips (leaves just under the bottom petals), but be sure to leave at least an inch so you have something to grab on to.

It takes a bit of work, but pull the hips/base of the petals down the stem until you get it off. Once you get that first part off, it should be pretty easy to get the petals off.


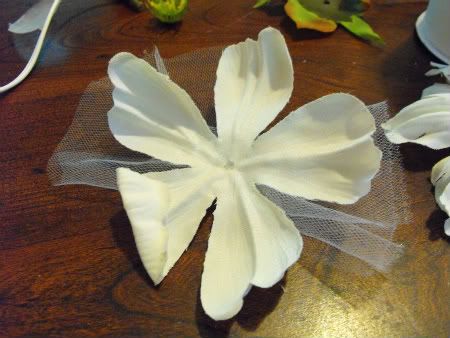
Take all the layers apart and take out any plastic pieces separating the petals. You will be left with a slightly-less poofy flower.


I chose to leave out the biggest bottom layers of petals as this was a rather large flower.


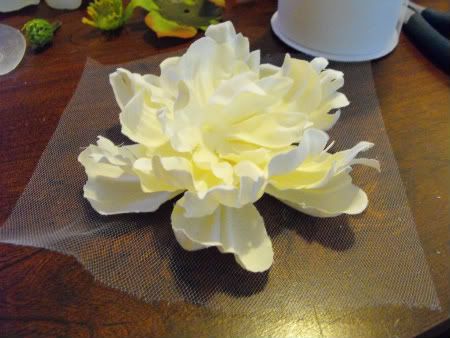
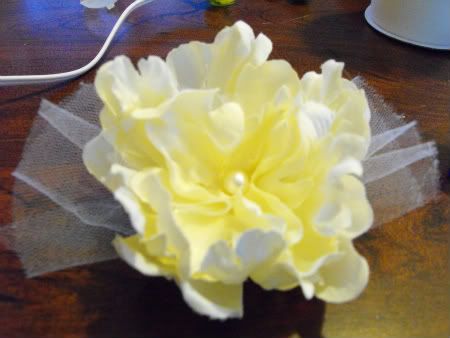
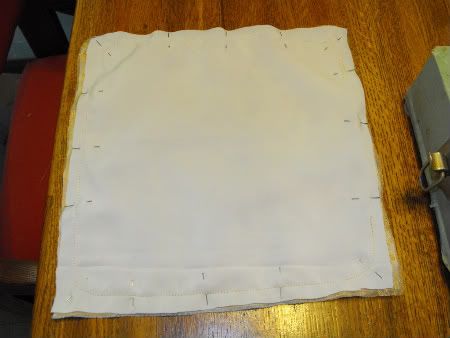
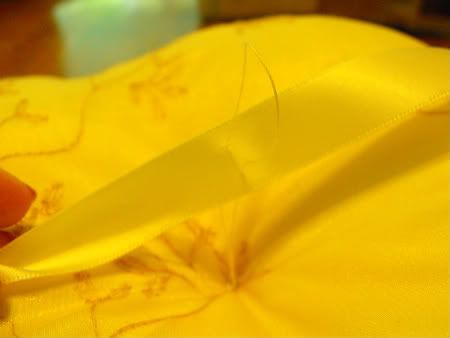
Cut out a square piece of tulle, slightly larger on all sides than your flower.


Fold it like a fan. I've got mine like a twisted fan, because I thought it looked better, but just do whatever you like.


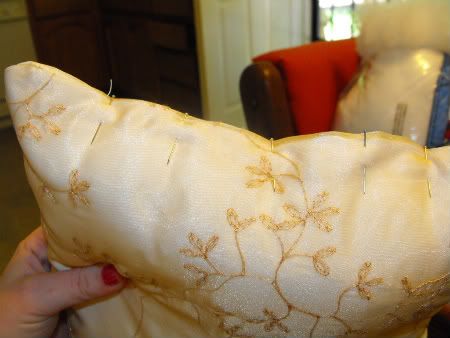
I don't recommend you do this next part like me unless you enjoy burnt fingers. Use your hot glue gun to glue the bottom layer of the petals you're using in the corsage onto the tulle. I just did a small dot in the middle and that was fine, aside from the burning.


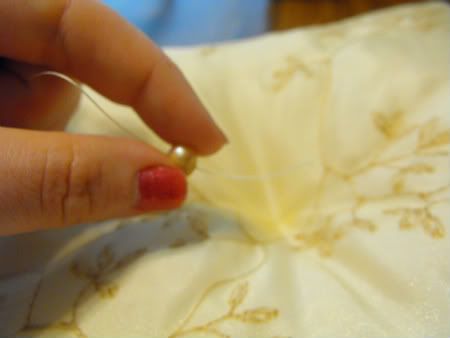
Keep gluing petals in ascending order. I added a few smaller squares of bunched-up tulle in between layers, to give the petals some lift and add some more texture to the flower.

Pro tip: To add more dimension, put a small dot of glue on the base of each petal of a new layer before gluing it down, then bunch the flower together while you set it in place. Hold it for a few seconds to let the glue cool before letting it go.

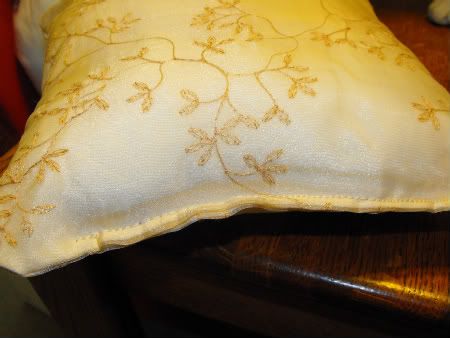
Once you reach the middle, glue a pretty pearl in the center where the plastic stamen used to be.


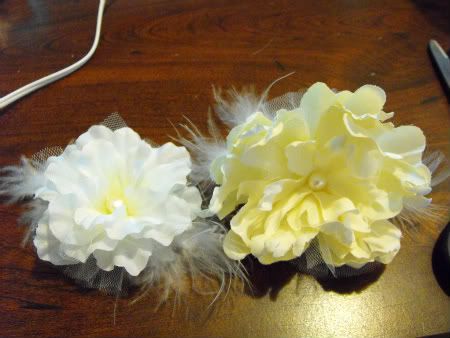
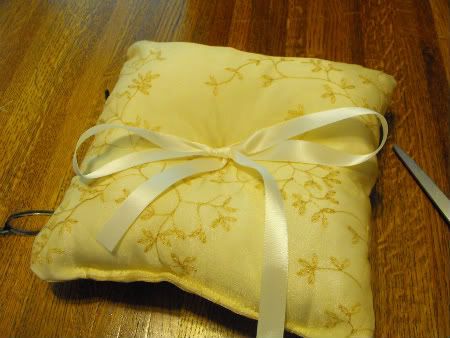
Trim the edges of the tulle close to the flower and add a few feathers if you wish. Ta-da! Some gorgemous flowers for the wrists of our mothers.

I'd originally planned to get a dark orange flower for my mom, but was unable to find one I liked. I used a flower that I already had at home (it might look familiar, in fact), but it's quite a bit smaller than the other one, so I will probably keep looking for another.

And there you have it. The flower tutorial I never thought I'd write. It's so easy, in fact, that I've decided to make the boutonnieres for the guys, too.

Part II with the wrist loop coming soon!

Would you consider fake corsages?

They're Doooooooooooooone!

I can't even begin to tell you how freaking excited I am that my hand-made invites are finally done.

Okay, I can.

I'M SO EXCITED.

I have been metaphorically wiping my brow for twenty-four hours now. Thanks to the kind help of my mom, my sister, BM K., BM J., and my future mother-in-law, we got most of them stamped and assembled last weekend. This was the crowning touch on months of designing, printing, cutting, punching, stamping, embossing and crying (a little, mostly at my printer).

This week, I put the finishing touches on the few we didn't finish last weekend, and tomorrow morning these babies are going to accompany me and S. to the post office. Then it's buh-bye until their little RSVP card spawn start making their way back to our mailbox. Awww. Babies are so cute.

So, since only a handful of our guests have received them yet (I, uh, handed them out at work today, please don't kill me), I won't do the big reveal til we start getting our cards back. In the meantime, I leave you with this beautiful sight:


Personal Photo

Aren't they GORGEOUS? Okay, so you can't really see them. Let me paint you a picture: vellum envelopes, sage-green embossed pocket folds, and an ivory belly band.

And with that, I leave you to your thoughts while I relax in the warm afterglow of their completion.


A Pillow For My Nephew

My nieces, who live across the country from us, are seasoned wedding pros, and I'm fully confident that they won't need any direction from me.

Their little brother, my three-year-old nephew, is adorable, sweet, and charming. He was born with a rare chromosomal disorder, but he doesn't let it get to him. Despite limited mobility and some developmental issues, he is the most amazing little guy, and I hope he'll be able to handle the pressure of being our ring bearer on our wedding day.

The thing is, I don't think anyone will know if he's okay with all the attention and the lonely walk until it's time to do it. But that's not a concern-- I'm totally fine if mom and dad (Sister S. and her husband) carry him down the aisle.

I'm not even sure if he will manage to hold onto anything on his trip down the aisle, but I wanted to give him something just in case. But all the ring-bearer pillows I had seen were devoid of my color-and-detail loving personality, like this:

Source

Although, looking through David's Bridal's website just now while hunting for this picture, they do have some newer, more colorful ones. Hmph. I still stand by making my own since it was less expensive. Moving on.

So here's what you'll need to make your own ring-bearing pillow (fabric will vary depending on the kind of design you want):

-Two 1-foot square pieces of a sheer fabric of your choice
-Two 1-foot square pieces of a solid fabric of your choice (satin or lining fabrics work well for this)
-3-foot length of a complimentary ribbon
-Pins
-Fabric scissors
-Sewing machine or needle and a steady hand
-Color-matched thread
-Loose cotton batting/stuffing
-One pearl (optional)
-The second season of Futurama, if you're so inclined


Start by sandwiching your four pieces of fabric together. This part can be tricky if you're not used to sewing. Basically, you want an inside-out sandwich. The easiest trick I use is to make two piles of fabric, with the solid material on the bottom and the sheer fabric on top. If your sheer fabric has embroidery, be sure to put it right-side-up onto the piles.

Then you take one pile and turn it over and put it face down onto the other, face up pile. Phew. Make sense?


Here you can see the details of my fabric sandwich. Yum.


Once you have your fabric stacked the right way, pin it together on all four sides. You're only going to sew three initially, but you want the stability of all four.

Go ahead and sew three sides and about an inch or two on either end of the fourth. I'll wait.


Okay, so: once you've done that, flip your pillow inside out (take the pins out first). I like to stick my fingers in all the corners and make sure they've popped out and that it's mostly square. If it's not, you can always flip it back again and re-sew to correct the shape.

Once it passes muster, stuff it up to your preferred level of squishiness with the cotton batting.


Fold the open edges over and pin the hole shut.


Sew it up as close to the edge as you can and take out the pins. Check to make sure you sewed the whole opening.


Thread a needle and knot one end. Shove it through the middle of the pillow and out the other side. Do this a few times, pulling the thread tight each time, until it stays. This will draw the middle together and give it that pinched effect.


Find the middle of your ribbon and put a stitch through it on whichever side of your pillow you want to be the top. Sew it through the pillow a few times.

Pro tip: Use a thin bead of regular craft glue on each end of the ribbon to keep it from fraying. Let it dry before you sew it to the pillow though.


On the other side, you can string up the pearl and sew it tight.


To finish it off, pull the thread tight and either knot it as close as you can (difficult) or hot glue it down (messy). I went with knotting.


Tie the ribbon in a pretty bow and voila! A pretty, personal ring pillow of your very own.

This took me maybe twenty minutes from cutting the fabric to tying the bow in the ribbon, and I don't consider myself an advanced sewer (though my first attempt at apparel is on the horizon, yikes!)

I can't wait to see what my nephew does with it!

What projects have you been driven to do yourself because you didn't like what was out there?

(All pictures in this post are my own unless a source is noted).