Wednesday, March 31, 2010

Wedding Band Epic


Fair warning: this post is going to make me sound neurotic, crazy, and self-absorbed. It's okay. I have been known on occasion to be all three.

The hardest thing about planning this wedding (thus far) hasn't been picking the cake pattern, or finding a DJ, or an endless hunt for the perfect dress.

No, I have all those things squared away. The hard part has been finding a wedding band to go with my engagement ring.

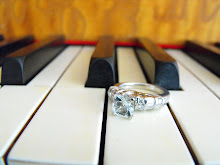
If you remember, here is my beauty:


It's platinum, with a cathedral setting, and alternating round and baguette diamonds down the sides. It's a hard ring to match.

I've been going into every jewelry store I pass trying to find "the one". I haven't been having any luck.

I have quite a few considerations, too. First of all, I'm kind of superstitious-- I want to wear the ring that S. puts on my finger on our wedding day for the rest of my life. So getting something "for now" doesn't really work for me. I also want to be able to wear it both with and without my engagement ring. Because my e-ring is so large, a band will probably only look good with it if it's narrow. But a narrow band won't look good on its own. And I do want to continue to wear my e-ring where it belongs, and I do want to look married when I do (so no moving it to my right hand or only wearing it).

Secondly, I work with animals, specifically large, unpredictable animals. I don't want something that's going to break or fall out if I have a bad day at the ranch. I want a band that will lay flat against my hand and not cause a danger to my animals, or itself.

Thirdly, I love sparkle. I really, really want more diamonds in the band if at all possible, and besides that, plain metal looks strange with my ring.

Fourth: I have sensitive skin and all the women in my family have had reactions to their wedding jewelry. My engagement ring is fine so far, but it's platinum, whereas theirs have been white gold. I don't want to have to buy a platinum wedding band but I'm worried about long term wear-ability if I don't.

And fifth, but really key, is cost. S. already spent way more on my e-ring than we thought we would.

So, to sum up, my ideal ring:

-Will look good both with my e-ring and on its own
-Won't cost much
-Will be made of platinum and have diamonds.

Yeah, I know what you're thinking. I've been thinking it too, lately. Such a ring doesn't exist!

I'm coming to terms with this. Right now, my best solution is to get two bands, one to wear with the e-ring, and one to wear without.

Here are my contenders if I go this route.

This one has a slight curve in it, but it lies nicely along my e-ring:

Source

And one of these for everyday (animalday) wear:


Source


Source


Source

Of course, none of these are platinum (sigh) but I think if I want to keep it under budget I'm going to need to give up on that particular dream. My mom has this old trick of painting the inside with nail polish to keep it from causing a reaction. Hopefully that will be enough!

S. has also expressed an interest in maybe getting matching bands, so that might be an option too.

Did you have any trouble finding a band to go with your e-ring? What do you think of my choices so far?

Monday, March 29, 2010

Vending MACHINE-- The DJ

I feel like a little kid who hasn't done their homework.

Tonight we have an appointment with our DJ. He didn't give us any explicit instructions, but S. and I had both agreed we should have a tentative music list ready to go anyway.

Notice I said "agreed", by which I imply that we haven't actually accomplished said task. I've been putting songs on the list for a little over a month now, but S. hasn't added anything. Odd, because music is definitely more his thing than it is mine. So, we shall go before the DJ tonight with only a sparsely-populated list of ideas, and hopefully he won't give us detention for not having done our assignment.

Our DJ was really a simple decision-- he's a co-worker of S's. It's actually quite funny how many people he works with that do wedding stuff on the side (see future posts about a possible day-of-coordinator). S. has seen this guy's work at parties before and agrees that he's quite capable, so I have confidence that he will give us his all on our wedding day.

Was your DJ an easy choice or a hard one? Did you have to look very long to find them? Did you have your music list picked out fairly early?

Sunday, March 28, 2010

Wedding Dreams?


I've been having my first wedding dreams. Last night, I had one where it was as if we were having the wedding now-- everything that we haven't figured out was the stuff that was missing. I had to buy S.'s suit twenty minutes before the ceremony. We had no food for people to eat because we had no caterer. I was trying to buy candy for the candy buffet without S. seeing me. But-- I was incredibly, amazingly, fantastically joyful. All in all, it was a pleasant dream.

Odd, because usually wedding dreams are stress dreams. Clearly, there was stress, but I wasn't worried throughout the course of the dream. I was just happy to be marrying the love of my life.

I sincerely hope I can actually be that fancy-free on my big day. It's inspiring, to have gone through a practice run in my mind, and having felt that good about everything. I promise myself that I will try to let the little things roll off me that day, and instead focus on my happiness!

What about you? Do you have dreams about your wedding, and if so, have they taught you anything?

Wednesday, March 24, 2010

Jewelry Dilemma

When my mom and I were out buying up teacups, we happened across an absolutely stunning neck piece.

When I saw it, my heart started racing-- I'd had dreams about beautiful, big neck pieces like the Ancient Egyptians wore. This piece was gorgeous, but it was also huge.

I didn't care, and I didn't *really* think it through. Instead, I put it on and marveled at how sparkly it was, and my mom agreed to buy it for me. I got it home, and took some pictures, and tried it on again, and. . . I began to have doubts.


It's stunning, but my dress is simple. My veil is simple. My venue is a garden. This necklace doesn't exactly scream "afternoon tea" to me-- much though I wish it did. Which is a shame, because I still love it.

Once my dress arrived and I tried it all on together with my mom there, we both agreed. With the other things I had going on, it was too much. Sigh. So, I'm going to go plain in the neck area and have a colored ribbon sash around my waist instead.

But, there is hope after all-- I'm thinking this will be just the right piece to add some funk to my rehearsal dinner dress!

What are you doing for wedding jewelry? Have you had any dilemmas with pieces you loved but that just didn't "go"?

Monday, March 22, 2010

Going for a ride on the...


Teacups!

I love antique teacups. My grandmother had a beautiful collection that included several child-size sets. Whenever my family came over for dinner, she would take down a regular-size cup and saucer for herself, and a matching child-size one for me and my sisters, and we would drink from them. It's one of my most cherished memories of her.

So when I picked a "Victorian garden tea-party" theme, it was only natural that tea cups and saucers play a major role in the decor. Unfortunately, when my grandmother passed away, her collection of teacups was whisked away before I could say otherwise. Therefore, for my wedding, I'm starting my own collection.

My mom and I have been scouring antique stores for several weekends in a row looking for teacups. I have this grand plan to use them as candle holders on the reception tables (so people aren't tempted to play with or drink out of them) and then keep them afterward for my own personal collection. I've been very picky about what cups we'll buy, as a result, but I'm really happy with what we've found!

I don't recommend this for everyone. Antique teacups can be expensive-- most of the ones we've bought have been between $12-$25 a piece. And I only buy on the higher end of that spectrum if it's a cup that I really, really love.

It's been a blast to do this-- I'm learning more about famous names that I've been hearing all my life but never understood until now: Limoges, Wedgewood, Noritake have all become personal favorites.

Take a look at the spoils of our first trip-- we found seven "useable" cups and one tiny little miniature Limoges set that will be staying home the day of the wedding.


Aren't they adorable? I can't wait to display this collection in our home after the wedding, too!

I believe I'm up to 18 or 19 cups. The one in the middle in the picture above is called "Dragon Ware" which, while I adore, doesn't really go with my theme, so that one will probably stay home, too. But I'm thinking at least two or three teacups per table, some like they're supposed to be, other sets flipped over with the saucer on top of the cup and the candle on the saucer. I also have a few plates (without cups) that I'll set pillar candles on, and we have some crystal wine goblets I might use as well to add some height and dimension.

My dream for the centerpieces is to find teapots to use as vases-- but teapots are far harder to find! I haven't found one yet that I really like.

What do you think? Are you buying anything for the wedding decor that you'll keep and cherish afterward?

Friday, March 19, 2010

Sangria, anyone?

One of the many wedding trends that S. and I are jumping on is the signature cocktail. Our reception will be primarily wine and beer, and neither of us are big liquor drinkers. Only a handful of our guests are hard-core drinkers/ partiers, and they can all make do with beer and wine.

I asked S. if he wanted to do a signature cocktail and he immediately came up with sangria. We both love sangria, and I've tried to make it (albeit somewhat unsuccessfully) once before.

So why, might you ask, am I crazy enough to try making my own sangria for 75 people? Well, I've learned a lot about sangria since my failed attempt nearly two years ago. I've learned a bit more about wine, and a lot more about food and cooking, too. I think a bright, berry-infused, fruity wine would be the perfect touch to our garden tea-party.

Last weekend, my mom and I made a stop at BevMo for some wines and fruit-flavored liqueurs to experiment with. Today, on my way home from work I stopped at the grocery store and picked up some fruit. I got lemons, granny smith apples, bartlett pears, raspberries, blackberries, and strawberries. We had five different kinds of wine but that included two merlots, and I only had four pitchers. After tasting both merlots, we opted to use only one.

I plan to wind up with a red sangria and a white sangria, unless one kind is a clear winner over all the others. We'll be tasting the final results at a dinner party next weekend.

Here's the recipe I used; keep in mind that it will likely need some tweaking. I will probably use this much fruit per 2 gallon jug of sangria, whereas here I used it for a 1-liter pitcher.

Per pitcher, I used:

-A half lemon, cut into wedges and de-seeded
-Four strawberries, tops cut off and cut into slices
-One bartlett pear cut around the core and into chunks (minus the stem)
-1/3 of a granny smith apple cut into chunks (de-cored and stemmed)
-Handful of raspberries (yeah, I know, real specific measurement, huh?)
-Handful of blackberries
-2 shots of blackberry brandy
-1 shot pomegranate schnapps
-1/2 shot peach schnapps
-1/2 shot raspberry liqueur
-1 whole bottle of wine. I used one each of a tempranillo, a merlot, a chardonnay, and a vinho verde.

We had found over the course of the last week, by throwing a splash of the fruit liqueurs into our regular drinking wine to taste, that the raspberry and peach flavors were too sweet and overpowering. The blackberry brandy is great, and since sangria typically has brandy in it, I opted to use a little more of this one than the others. The pomegranate was pretty tasty too, and I did want the raspberry and peach flavor in there, but just a hint of them.

I'm going to let it sit for a week (hopefully untouched) and then I'll post the results for you, and our winners!

Are you doing a signature cocktail? Are you going to make it yourself, if so?

Wednesday, March 17, 2010

And now for a dress you can see

My rehearsal dinner dress!

I found this sassy little number at Sears, in the Juniors Prom dress department. Which was kind of depressing at first. I automatically assumed they wouldn't have any that fit me. And then was surprised when they did.

I didn't buy it right away, just decided to keep an eye on it. We went by one night a couple weeks later on a whim to look at suits for S. and there was a red sign above the rack where they were.

On sale! On sale! It was on sale!

I ran over and grabbed the biggest size they had (a 9), deciding to try it on, because, well, even though there was no chance in heck it would fit-- I have hips, and a large chest, and it often seems like *nothing* fits-- if by an off-chance it did, I was getting it now.

Well, it fit. Mostly. It, um, is rather small up top, as I feared, but-- I can work with it. Unfortunately I only have hanger pics for right now as the pics with it on me are a tad obscene, but once it's altered I will happily post away.

Check this cutie out!


It's kind of hard to tell, but the overlay material has little sparkly polka dots all over. It's darling, and very garden-y, which I adore.

So I wasn't planning to buy it when I did, but I'm so glad I did!

Where did you find your rehearsal dinner dress? Did you go hunting on purpose, or just come across it?

Tuesday, March 16, 2010

How I Found My Dress, or, The Dress, Part I (even though Part II already got posted)

One of the things that I was most excited about about being engaged was finding my wedding dress. I've been dreaming of dresses, idly and voraciously, for as long as I can remember. I envied the soft fabrics, the pretty draping and beading, the light lace. The styles, the silhouettes, and the dramatic power of a few pieces of fabric and tulle to transform any woman into a bride.

I'd seen it happen with my own eyes. I'd watched with tearful pride as both my older sisters and one of my best friends emerged from the fitting room with an ethereal glow in their cheeks the day they found their dresses. The same glow carried them down the aisle on their wedding day.

To me, the dress is the hallowed silence, the secret place that only the bride gets to go. It is her sanctuary.

So naturally, I was a little overwhelmed by the magnitude of shopping for my own dress. Other people had weddings; other women tried on dress after dress before their friends and family. Other women glowed. It was odd to call the women in my life to arms to go shopping, but call I did, and they all agreed to come out on a Sunday afternoon a mere two weekends after we were engaged.

But my mom and I were talking the week prior to the dress-shopping trip, and she suggested we go to David's Bridal that Friday to do some "research" and see if we couldn't narrow down the styles I'd like to try on elsewhere.

I had had my heart set on the Alfred Angelo Dream In Color collection ever since I had first seen those dresses while shopping with my best friend and now-married bridesmaid K. two years prior. I thought that our one and only appointment would be at Alfred Angelo. And I thought that David's Bridal carried somewhat generic dresses. I agreed to go to DB because I thought yes, that would be a great place to do research, but nothing more. I wouldn't let myself get attached.

Well, as usual, I was wrong.

We tried on a handful of dresses that night, and had two top contenders-- let's call them Alice (because it somehow reminded me of Alice In Wonderland), and the Princess Dress. Then we went to one more store just down the street and tried on some Maggie Sotteros and Casablancas. There was a Casablanca contender, but it was quite a bit more expensive than any of the dresses at DB, so we decided we'd bring everyone back to both this store and DB after my appointment on Sunday at Alfred Angelo for final opinions.

Well, I couldn't stop thinking about the Alice dress, even on Sunday morning as I tried on dress after dress. The ladies with me fell in love with a dress at Alfred Angelo's, and that dress (let's call it the Queen Dress), remained a favorite through the other two (I opted at this point not to re-try the Princess Dress). But when I put on Alice-- I came alive. I felt giddy, and light as a feather, and . . . beautiful.

Leaving Alice to go get the Queen Dress felt like cheating on a lover. My mom put it best when she said that the Queen Dress was the dress for the bride I wanted to be-- fancy, LOTS of beading and lace, and a beautiful, elegant train. But Alice was the dress for the bride I was-- simple, still regal and beautiful, but not overpowering.

That did it. I made my decision, even though my sister and my friends still preferred the Queen Dress.

Alice will be my sanctuary on my wedding day, my hallowed silence among the chaos.

Aside from my new husband, that is.

How did you decide on your wedding dress? Did it take a couple of try-ons or did you know right away? Did you go along with what the people you brought thought, or against them?

Monday, March 15, 2010

It's here! It's here! It's here!

S.!!!! This is about the dress. Go AWAY!

(i love you!)

All right. Have at it. Call me old-fashioned. Call me superstitious. Call me silly.

You'd be right. (I liked Victorian stuff before it was cool to like Victorian stuff, okay?)

I'm . . . paranoid about posting pictures of myself in my dress before the wedding. I'm even paranoid about posting pictures of it, period.

I'm afraid this is one thing you'll have to wait until 10-11-2010 or later to see in regards to my wedding day. It's kind of my prerogative, though, ya know? It's the Big Surprise, and I want it to stay that way.

Mostly because S. doesn't care whether he sees it or not-- but I do. I don't think he'd stop himself from looking if I went and made it easy on him to find out. Which is why there's a warning on this post even though there's no pictures.

Funny story, that. See, the reason I'm writing this post is that I got an email from David's Bridal last week that my dress had arrived. Not a phone call, mind you. An email.

And in the email, it gave a very short, three-word description of the dress and the style number. Luckily, no picture. It's almost enough though. The email address DB has on file is S. and I's shared wedding email address, one that gets forwarded to his regular email.

That's right, DB sent an *email* to my *groom* about my *dress*. Not once during the sign-up process or dress-buying experience did anyone tell me they would do this. I gave this email address to DB specifically so they wouldn't spam my regular email, and they've performed admirably at spamming this one. I did not expect they'd send an email about *my* dress instead of calling me!

Huff. I'm a wee bit upset about that, even though it's technically my fault. I guess I just never thought they'd do something like that instead of, ya know, calling the bride. But whatevs. Moving on.

I made an appointment on Saturday at noon to try her on again with my mom. I stepped into the dressing room an ordinary girl, and stepped out a bride. *Sniff*! I knew instantly I had really made the right choice getting this dress. (I'm doing this backwards-- the story of how I found the dress is coming).

I couldn't stop watching myself in the dress. I tried on all my accessories and possible accessories with the dress, to help make some decisions (decisions were made, let me tell you!) and made sure to wear my boots and bring my veil. With the puffiest crinoline they sell and the height of my boots, the dress is the perfect length. I won't need to get it hemmed at all, unless I shrink an inch between now and the wedding. Let's cross our fingers that doesn't happen.

I didn't want to take it off. But I did, and watched it get folded safely into its garment bag, and then laid it carefully in the car and hung it up in a closet at my mom's house. Now it waits for October 10th-- for me, for our day. Well, and a steaming and probably an alterations appointment before that. But mostly October 10th.

There's only one small problem-- my veil is the wrong color! My dress is "soft white" and the veil is stark white, and it's apparently quite noticeable. Le sigh . . . now I have to figure out how and what color to dye my veil. More on that later, I suppose!

Have you been able to take your dress home yet? How did you feel when you got to try it on again?


Friday, March 12, 2010

The Wishing Well, Part V-- Putting It All Together, At Last!

We're nearly there! So close to a cute, finished, personalized wishing well!

This project really wasn't as much of an undertaking as I thought it would be, but-- to be fair-- it still was pretty intense. I understand this has not been an everyone-can-cook sort of tutorial, but I hope someone out there learned something, or is able to re-create these results with minimal trouble. After all, I'm not exactly Martha myself. Yet.

Supplies:

-Everything you've done to the wishing well so far: the well itself on its newly-mossed (yes!) base, the bucket, the roof.
-Another ~7" piece of 1/4" dowel, plus a small scrap (see below)
-Wooden axle pegs (found in the same section I got my wooden circles for the bucket, and here)
-Two more of the wooden circles used to form the base of the bucket
-Cutting mat
-Hobby knife
-Aleene's Fast Grab Tacky craft glue
-Twine or hemp jewelry rope to use as a "rope" for your bucket
-Drill with 1/4" bit
-Dremel with routing bit (?-- this is admittedly the part S. helped me with and therefore, I have no idea what it's actually called) and cutting/ sawing blade
-If you are afraid of power tools like I am, get someone who isn't to help you. Preferably of the fiance-cial persuasion, but only so he gets to help.

And here we go. Mark the dowels in the well to the same height, leaving enough room to put the roof on and still reach your hand all the way down into the foam pit below (so you can get the wishes out).

Use the Dremel to cut the dowels off at these marks. I recommend some sort of power tool without too much vibration or interference as sawing them by hand could break them out of the clay. The Dremel worked without a snag.


Add some glue into the clay pieces into the roof (you may also have to glue the clay pieces into the roof themselves once they dry-- mine shrank ever so slightly, and therefore needed to be glued). Stick the dowels in and align the roof into its final position.


Cut the piece of dowel for the bucket pulley if you haven't already (the 7" piece mentioned above). I also had S. drill a slightly larger than 1/4" hole off-center in two of the same wooden circles as I'd used to make the base for the bucket. I also had him use a routing/ carving bit on his Dremel to carve a channel in them so they would make more contact with the post dowels and be more secure.


Put glue in the channel and stick the wooden circle to the post until it stays without assistance. Though it's only pictured halfway here, do the same on the other side.


Here you can see I've cut a small piece of dowel (about 1/2-3/4") and notched it. I've also notched an axle peg (the funny little stick with the round button on the end). This is to make a handle so your bucket can be hand-wound. (Warning: you may also want to enlist the power tools to help with this. I used my hobby knife and The Force to do this, but I broke one blade! Be super careful if you go this route, and make sure you have a clear area so you can find the sharp pieces of blade if you do snap one. Wear eye protection, too).


Glue the notch in the short piece of dowel to one end of the long piece of dowel.


Once it's set, glue the notch in the axle peg to the un-cut end of the short piece of dowel.


Ta-da! A tiny little crank. In the picture above, you can see I got a little too excited and started to wind my "rope" around the long dowel already. Don't do this.

Once I took the rope back off, I threaded the dowel through the first hole/circle, put the rope back on, and then threaded it through the second. At this point, it was super-loose and waaaay too long. The bucket wouldn't stay up and I was really worried about having to find a way to keep it up artificially.


Luckily, I had the brilliant idea to measure and cut the dowel to a more reasonable length (after, yes, taking off the rope and then re-putting-it-back-on again. I'm a dweeb). I also sawed the button off of the end of another axle peg (again, I recommend power tools instead of stupid hobby knife. Stupid hobby knife took me about two years. I am 27 now. Gah.) and glued this to the loose end of the long dowel once it was back through (and the rope was back on, again).


I had to sit and hold this for a good 15-20 minutes and turn it periodically so it wouldn't glue itself in one place, but once it grabbed, it turned out to be perfect! It was just tight enough that the bucket no longer plummets to its doom the instant you stop holding onto the crank-- it now holds itself up.

Ready to check out this uber-cuteness? Here you go!


Sorry for the yellow color in the pics-- my camera is an animal unto itself sometimes.

Variations:

I may still do this one: there is the option of spraying all the wood with a varnish or paint wash before you put everything together to give it an older look. I'll do another tutorial if I do this after the fact.

Learn From My Mistakes:

This part went pretty smoothly. I can't really think of anything that made me want to scream or tear my hair out. Except my kittens screaming and trying to tear the moss out of the base... but luckily, I caught them in time.

Do you think you would ever do something this complicated from a tutorial? What do you think of my well? Does the wood need color, or is it okay as-is?

Wednesday, March 10, 2010

The Wishing Well, Part IV-- The Base

This part was by far the most tedious part of the well. It was still fun, but it was an exercise in patience. See, apparently, not all the pebbles on the outside of the well were pressed far enough into the clay. When I peeled the well off of the lazy susan to measure the hole for the foam (more about that in a minute), several of the pebbles came off. I had to spend about ten minutes searching for loose ones and gluing them back on. So, pro tip for the first part of the wishing well: add a dab of glue to each rock as you place it in the clay. It may take a little longer to dry but it will be SO worth it later.

All right, let's get this part on the road. We're almost done! (Yay!)

Supplies:

-I used one 3 ft. by 1 ft by 2 inch thick piece of white styrofoam. I saw this exact piece at Michael's and JoAnn's.
-I used Beacon's Hold The Foam glue, along with my now-old standby,
-Aleene's Fast Grab Tacky Craft glue (be warned-- I used almost a whole bottle on this part. Don't start this with only a partial bottle on hand).
-Floral decorating moss
-Fake flowers and ferns-- small enough or with small enough parts to be miniature and approximately in scale with the well
-Utility knife
-Steak knife
-Permanent marker
-Yard stick
-1-foot-square piece of cardboard
-An outdoor area and maybe a dust mask.


You can see most of the supplies here.


I measured and drew lines with the permanent markers to divide the foam into three 1-foot sections.


I set the well onto one of the sections to trace the inside of it with the marker onto the center of the foam. Doesn't matter which section.


Then, I used the steak knife to cut the three big pieces apart. I only used two; you can use three if you really want it deeper but I think it would look unwieldy with the extra height. (I used the utility knife to cut the cardboard out).


Then I sawed out the circle I'd traced on one piece of foam. You may have to do a little smoothing with the knife to get it even and not slanted. I didn't worry about making it look too pretty; hopefully it will be invisible. I traced the existing hole in the foam onto the second piece and cut that hole out too, checking a few times to see that the two holes mostly lined up and were fairly even.


Then I made a sandwich. I glued one of the foam pieces with the foam glue to the cardboard square, thus making the bottom of the "well". Then I glued the other foam piece on top of the first one. Then I glued the well over the hole, all still with the foam glue. After this, I slathered a section of the foam in the Fast Grab tacky glue and started to tear pieces of moss (and also glue them, for added insurance that they would stick) and cover the foam with it.

I wish I had thought to spray paint the foam green beforehand. It would have made the whole "mossing" process much easier. Also, another note: the moss is very messy! It comes complete with dirt and sticks and leaves straight from nature. I suggest doing this outdoors or in an easily cleanable area, and in clothes you don't really care about.


And here we have the completely moss-ed foam.


To finish, I just glued the ends of and stuck in little pieces of fake fern and mini flowers I found in the floral section at Michael's. Now it's growing! Yay!


Learn From My Mistakes:

-If I had to do this over again, I would spray paint the foam a similar green to the moss beforehand. There are little white places peeking out all over that I'm sure no one else can see, but are bugging me no end.
-I would have put a dot of glue on each of the pebbles as I stuck them in the clay the first time around instead of having to let them fall out and then glue them back in once it dried.
-I would have put down a trash bag to start with and not worn my clean PJ's while I was "moss-ing".
-I would find other places to use moss as a verb.

On Friday I'll finish this up. I can't wait to show you the final product!

Monday, March 8, 2010

Why I'm wearing cowboy boots to my Victorian Garden Tea Party wedding

Note: I'd planned on doing Vending Machine again this Monday, and for as many Mondays as possible, but I'd like to wait to run those posts til I have more info from my vendors.


This is Gypsy.

She was my first horse. I had her for seven amazing years-- she was my best friend, closest companion, confidante, and mentor. I called her my "baby", like I do all my pets, but she felt more like a mother.

This next part (if you haven't already tuned out) may go over your head. Gypsy taught me a lot about horses. She taught me how to ride, how to act, how to overcome my fears. She was the perfect horse-- calm, eager to please and learn, well-behaved but spunky, and an affectionate, loving sweetheart.

Three years ago, I also bought her then-five-year-old filly, Tally, from the same man who'd sold me Gypsy. Tally needed help-- a lot of help-- and the lessons that I'd learned from Gypsy helped me help Tally. But, even three years later, Tally is still "special"-- she's spooky, and while an absolute sweetheart like her mother, I have to keep a very rigid routine with her to keep her calm. She is like her mother, but she is not her mother.

What does any of this have to do with my wedding? Well, for as long as I had Gypsy, I always told myself that someday, some glorious day, when the man of my dreams asked me to marry him and I was ready to take that walk, I would do it with my little girl. I had fantasies of riding in in my big white dress-- sidesaddle, of course-- and having her there with me on that day.

You may notice I use the past tense when I talk about Gypsy. Last August, after a mild respiratory infection, she foundered. I won't go into the details here, but basically, founder is a crippling disease that often results in horses having to be euthanized-- and the first vet I consulted immediately told me it was too late. Luckily, I found another amazing vet and a new farrier who worked together to bring her back from the brink of death. I was safe, I thought. I knew Gypsy wouldn't live to be 30 like a lot of horses do nowadays, but I wasn't ready to lose her at 21, either.

Then the respiratory infection came back, and the new vet diagnosed it as COPD. Within a day of that diagnosis, she stopped eating. She stopped drinking. She wouldn't take her medications. I did everything I could, but it was too late-- she went into shock and colicked.

I lost my little girl that day. My sweet, amazing, precious girl. Words can't describe how amazing Gypsy was, or how much she meant to me.


So, since Tally isn't an option due to her unpredictability-- even though I love her just as much as I loved her mother-- I decided I wanted something symbolic of that lost opportunity with me on my wedding day. My dress will cover them, but they'll give me a low heel to add a tiny bit of height, and I can walk in them completely free of the duck-walk most heels give me. Most importantly, I'll have a reminder of my "puddin'" with me all day. A day that she never got to see.

Yesterday, my mom and I went shopping and I found the boots I will wear on my wedding day. Sure, they don't go with my theme. But they go with my heart, and my heart wants to remember those important to me who won't see this day.


I have some other plans for small memorial items in my wedding. Stay tuned for those, too. What, if anything, are you doing to remember those you've lost?

Friday, March 5, 2010

The Wishing Well, Part III-- The Roof, The Roof

I'm so excited to keep sharing the wishing well. I love this project; it's been my favorite so far. And it's almost done! Stay tuned next week for the final touches. It's been a long road (though not nearly as long or as difficult as I thought it would be), but worth it.

Today, I'll show you how to make the roof. For this, you'll need the following.

Supplies:
-Cutting Mat
-Hobby Knife
-Thin Balsa; I used the thin 3"x5" "planks" in my handy-dandy balsa grab bag I picked up at Michael's, but I know some stores sell these in larger sizes-- you can cut it down to size yourself really easily. I chose balsa because, even though it's a very weak wood, it's lightweight (therefore reducing the possibility of structural overload) and I could cut it/ manipulate it myself really easily-- no power tools needed.
-Glue-- I used my now-favorite Aleene's Fast Grab Tacky craft glue
-A small box
-Saran wrap
-A glass of Sangria
-Movie of your choice: I watched 27 Dresses (again, I confess!) while doing this.

First, I took a few of the planks and broke them up to make shingles. I started by breaking them along the grain in long strips, and then breaking the long strips into pieces about 3/4" long. Don't worry about the ragged edges, unless that's the look you're going for. You could also cut these if you wanted them straight; breaking was faster for me and more in the style I was going for.


You can see the long strips to the right and the growing pile of shingles in the back. I made a LOT of shingles, and still had to stop and make more about 3/4 of the way through. Overestimate how much wood you'll need.


Then I made the base for the roof. I measured my well and figured I'd need about a 6" span to cover it from side to side. My planks were only 5" long, so I had to cut and add a 1" piece to them.


I was going to stack them anyway for added strength, so I staggered the joints and glued three sets of 5" and 1" pieces to each other, with the 1" piece on opposite sides every layer. Note: Don't be shy with the glue! It will also add strength to the wood without adding much weight.


I made two stacks of three layers each, and placed them under some handy bridal magazines to keep them from warping while they dried for a few minutes.


While they dried, I used another two planks to make two 3x3" squares, which I then cut in half to make four triangles. I glued these into stacks of two.


Then I went looking for something square to set this up in while the glue dried a little. It only took me about seven minutes to remember that boxes are, indeed, square. D'oh. I lined the inside of one corner with saran wrap to keep any leaking glue from adhering cardboard to the wood, and glued the two 6"x3" stacks together into a V. I then also glued in the triangles, one at each end. Make sure you glue these about a 1/2" or less from the edge; you want them to be on the outside of the post supports when you attach it to the well.


I let that sit for a good 45 minutes and then it was time for the fun part. I put a line of glue across one side and started gluing on shingles. Note: start at the bottom. I let the rough edges overhang the bottom just enough to hide the flat edge underneath, and let the upper rows overhang the lower ones as I worked my way up. I also didn't really have to worry about the shingles fitting on the roof too much; if I reached the end and needed a narrower one, I could just break it to size.


I did this for both sides all the way to the crest of the roof, and then broke some of the remaining shingles in half, but did not separate the pieces (so they were hinged). I glued these on to the top for a ridge and ta-da:


Mini-roof!

Coming up next week: More vendors, and putting the well together.

Wednesday, March 3, 2010

A wedding is like having a baby.

Well, I have to confess first that I have yet to have a real baby, so I could be way off-base here. I guess what I mean is that a wedding is like what everyone else says having a baby is like.

Do I sound crazy yet? I should. That's one of the symptoms, right?

Don't get me wrong, I am far from complaining. So far, planning and crafting this baby has been an absolute blast! But I am starting to see some parallels to what people with children have said being pregnant or watching their significant other be pregnant was like. Since getting engaged, I have become:

-Moody
-Obnoxious (obsessed with Baby, i.e, the wedding)
-Overly Sensitive to perceived insults and slights (non-existent, of course)
-Unable to control my appetite or diet
-Unable to stop surfing the internet looking for help in "raising" Baby
-Generally insane

What makes me the most upset, though, is that it's only been a month and a half! So far, I've been mad at a few people that I genuinely love and appreciate for some very stupid reasons, blown up at work (luckily to myself), stomped all over perfectly decent conversations about other things to bring up Baby, sobbed at ridiculously random parts of movies and t.v. shows, and gorged myself on Tagalongs ice cream. (The Girl Scouts--despite being an amazing organization-- and their evil accomplices at Dreyer must have it out for my hips and thighs).

But, on the other end of the spectrum, I've come to fall in love even deeper with my future husband, learned to appreciate the good that I do have in my life, learned to handle the stronger emotions more maturely, and developed a very dear fondness for the day we'll get married and the things it will bring.

I'm ready to birth this baby! Is it October yet?

Monday, March 1, 2010

Vending MACHINE-- The Venue

It's time to talk about our vendors. Today's vendor is our venue.

This was a pretty easy choice. If you remember, S. and I met and got engaged at a local community college that also happens to have an on-site garden that can be rented for special events. A really, really gorgeous garden. Take a look at the few pictures we got:


That's us, and that gorgeous white thing behind my right shoulder is the gazebo where we'll be getting married.


This is part of the plaza, where we'll be having our reception. There's a much larger, open space right around the wall from this area, but I like this little spot. It's more like a private garden.


They have a ton of arches all around. The place is actually quite large, though we'll only be renting a few parts of it.


This bench-- we love this bench. I see some great wedding day photos coming from here.

I'll post some more pics when we get them, as we appear to have failed at that the day of our engagement (we were distracted, to say the least). We were supposed to go out again this past weekend to meet with the event coordinator there (and take more pictures), but alas, bad weather approaching means our coordinator will not be able to meet us.