
Their little brother, my three-year-old nephew, is adorable, sweet, and charming. He was born with a rare chromosomal disorder, but he doesn't let it get to him. Despite limited mobility and some developmental issues, he is the most amazing little guy, and I hope he'll be able to handle the pressure of being our ring bearer on our wedding day.
The thing is, I don't think anyone will know if he's okay with all the attention and the lonely walk until it's time to do it. But that's not a concern-- I'm totally fine if mom and dad (Sister S. and her husband) carry him down the aisle.
I'm not even sure if he will manage to hold onto anything on his trip down the aisle, but I wanted to give him something just in case. But all the ring-bearer pillows I had seen were devoid of my color-and-detail loving personality, like this:
 Source
Although, looking through David's Bridal's website just now while hunting for this picture, they do have some newer, more colorful ones. Hmph. I still stand by making my own since it was less expensive. Moving on.
So here's what you'll need to make your own ring-bearing pillow (fabric will vary depending on the kind of design you want):
-Two 1-foot square pieces of a sheer fabric of your choice
-Two 1-foot square pieces of a solid fabric of your choice (satin or lining fabrics work well for this)
-3-foot length of a complimentary ribbon
-Pins
-Fabric scissors
-Sewing machine or needle and a steady hand
-Color-matched thread
-Loose cotton batting/stuffing
-One pearl (optional)
-The second season of Futurama, if you're so inclined

Start by sandwiching your four pieces of fabric together. This part can be tricky if you're not used to sewing. Basically, you want an inside-out sandwich. The easiest trick I use is to make two piles of fabric, with the solid material on the bottom and the sheer fabric on top. If your sheer fabric has embroidery, be sure to put it right-side-up onto the piles.
Then you take one pile and turn it over and put it face down onto the other, face up pile. Phew. Make sense?

Here you can see the details of my fabric sandwich. Yum.

Once you have your fabric stacked the right way, pin it together on all four sides. You're only going to sew three initially, but you want the stability of all four.
Go ahead and sew three sides and about an inch or two on either end of the fourth. I'll wait.

Okay, so: once you've done that, flip your pillow inside out (take the pins out first). I like to stick my fingers in all the corners and make sure they've popped out and that it's mostly square. If it's not, you can always flip it back again and re-sew to correct the shape.
Once it passes muster, stuff it up to your preferred level of squishiness with the cotton batting.

Fold the open edges over and pin the hole shut.

Sew it up as close to the edge as you can and take out the pins. Check to make sure you sewed the whole opening.

Thread a needle and knot one end. Shove it through the middle of the pillow and out the other side. Do this a few times, pulling the thread tight each time, until it stays. This will draw the middle together and give it that pinched effect.

Find the middle of your ribbon and put a stitch through it on whichever side of your pillow you want to be the top. Sew it through the pillow a few times.
Pro tip: Use a thin bead of regular craft glue on each end of the ribbon to keep it from fraying. Let it dry before you sew it to the pillow though.

On the other side, you can string up the pearl and sew it tight.

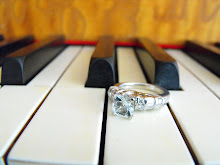
To finish it off, pull the thread tight and either knot it as close as you can (difficult) or hot glue it down (messy). I went with knotting.

Tie the ribbon in a pretty bow and voila! A pretty, personal ring pillow of your very own.
This took me maybe twenty minutes from cutting the fabric to tying the bow in the ribbon, and I don't consider myself an advanced sewer (though my first attempt at apparel is on the horizon, yikes!)
I can't wait to see what my nephew does with it!
What projects have you been driven to do yourself because you didn't like what was out there?
(All pictures in this post are my own unless a source is noted).
No comments:
Post a Comment