
I thought I'd take a break from the well for a little while (mostly because it's still a work in progress) to share some other things I've been working on. The next part of the well is the roof, which I'll get to later next week.
For a long time, I thought I wasn't going to wear a veil on my wedding day. I hated the idea of one somewhat, but mostly I just didn't like the way they looked. It felt confining and silly to try and hide my face from S. while I walked up the aisle. Plus, a natural klutz, I was sure not being able to see clearly and having something hanging down in front of my face would just bug the heck out of me.
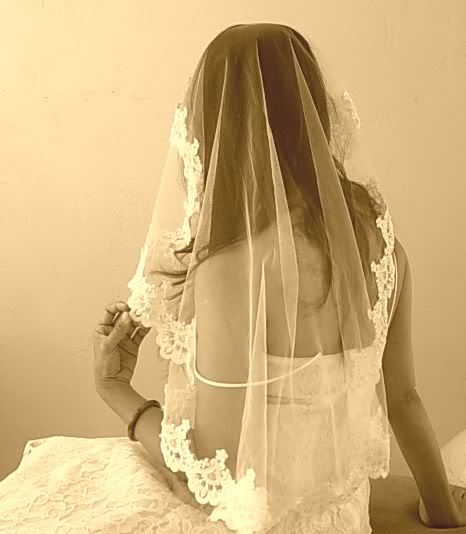
Well, this was before I knew that the covering-your-face part was optional. Thanks, Weddingbee! Then I started to see pictures like this:
Source
And this:

Source
And I decided they weren't so bad after all. In fact, I really rather liked them. Especially mantilla, and cathedral-length.
A mantilla veil unfortunately just really isn't my style. Also, it's a little beyond my capabilities as a sewer. See, this was another DIY project-- the other big reason not to get a veil was price. To me, paying between $150-$250 for a piece of tulle was just outrageous. Especially when I covertly studied a few samples in the store and came to the conclusion that making one couldn't be very difficult, if one didn't particularly care about binding the edges (I don't), or a blusher/face covering section (I definitely don't). So I looked up "how to make your own veil" and several results popped up that came together to be-- how I made my own veil.
So cathedral it was. I went to JoAnn's and found a super-fine tulle for about $3/ yard. They had both white and ivory, and since my dress is "soft white" but just looks white, I got white. I bought 10 feet, to be safe. This should be plenty no matter how tall you are, depending on how long you want the veil behind you (just to clarify, again, this is for a cathedral veil). I'm 5'6", and the veil is too long on me, but I'll have to wait til I have my shoes and dress on at the same time to determine exactly where to cut it to.
I also went to Michael's and bought a pack of 4" clear plastic combs from the bridal section for about $2.00. I had a leftover strip of a beaded edging from making my garter that I also grabbed to disguise the edges of the tulle on the comb.
So, here's the supply list:
-10 feet of bridal tulle in white or ivory
-4" or longer clear plastic hair piece comb
-Needle and white thread
-Glue (any kind, but the less runny, the better)
-5" piece of narrow decorative lace or other
-A glass of the white zin of your choice and a movie. My selection was "Cloudy With a Chance of Meatballs".
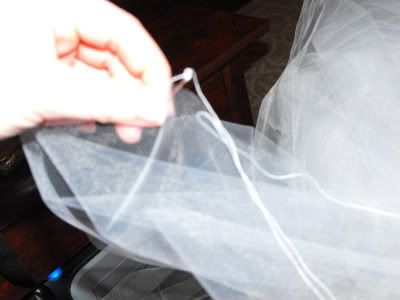
Thread your needle. I left mine "open"-- the trailing end was still attached to the spool, so I could use as much thread as I needed. If you cut yours, you'll need maybe two feet or so, but you'll only really use seven or eight inches. Give yourself room to work, though.
Open up your tulle so that the shorter edge of the material on one end is completely flat. I just folded the whole thing up in my lap and let some of it drape down the couch and onto the floor. Beware though, if you have small/annoying/adorable/nosy cats like I do, you may want to lock them up so they don't play in and then subsequently rip up your tulle.
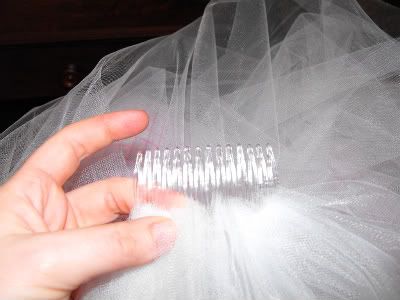
Find the corner. You're going to sew a running stitch across the narrow end of the tulle, so that it will gather together to fit on the comb. My running stitches were pretty big-- about an inch wide. They don't need to be very small. (Sorry for the blurry pics on some of these). You can't really tell much from this one, but this is about a third of the way through.
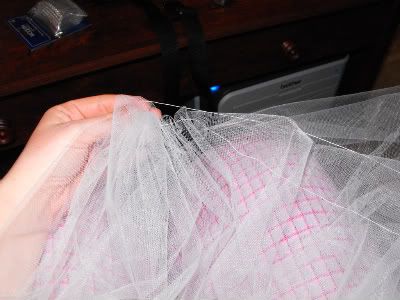
Once I running-stitched the whole edge, I went ahead and snipped my thread off the spool and tied a knot in the end. Because this tulle is so fine, the knot didn't have to be very big to stop it from pulling through. Once it was secure, I pulled the tulle down the thread to gather it and cut off and tied a knot in the other end at the right length of gather (hold your comb up to the tulle to get an idea of how long the gather needs to be).
The gathering:
Final length:
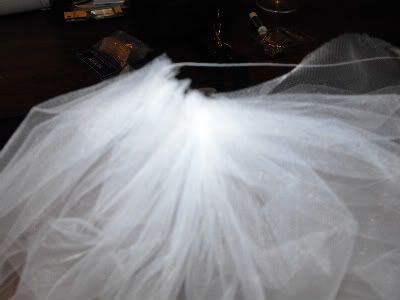
With the comb to check the length:
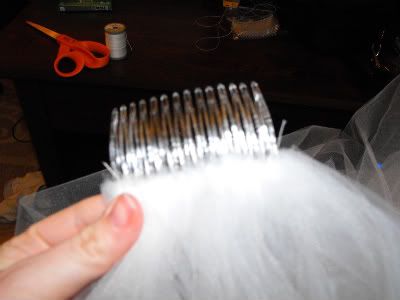
I attached mine with the tulle going next to the upper part of the comb. (If you're looking at the edge, the tulle goes on the top of the comb when it curves towards the ceiling). I re-knotted the leftover thread on my needle (you'll need at least a few feet for this part so you may want to re-thread if you cut your thread the first time) and started sewing the tulle onto the comb. I just did an over-under stitch around the base of the comb and between the teeth. I sewed pretty close to the edge of the tulle, as it won't unravel, and it came out pretty even.
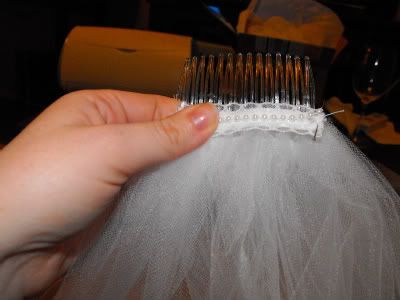
You can stop sewing here, or choose to embellish the comb a little to hide the rough edges of the tulle. Note-- the top edge of the comb will be hidden when the veil is on your head as it will be flipped over to go behind you, so you do not *need* to embellish. I chose to anyway.
I had a leftover piece of pearled edging from my garter that I cut into a 4.5"-5" inch strip, folding the edges under to leave the sides smoother, and tacked it into the comb and tulle in the same way.
To secure everything, I glued the thread and stitching down on the underside of the comb just to make sure I don't have any accidental unravels on my big day. Then I let it hang off of the bar in my (separate from S.'s) closet to dry.
Once my dress comes in, I'll post the final part of the veil-- cutting it to size and rounding the end, maybe adding some crystals or pearls throughout, and then pictures of me in it.
Learn From My Mistakes:
I'm not saying I'm perfect, but I didn't really have any "whoopsie" moments with this one.
Variations:
-If you want an edging of some sort, you'll need to figure out the final length, cut it to that, and sew on the edging before sewing it to the comb.
-Add crystals or beads scattered throughout if desired.

How beautiful and cool!! I definitely wanted to DIY my own veil, but I decided on a monogrammed one and that's not a possibility
ReplyDelete:( .. I will however DIY a birdcage veil for my boudoir photos...
Thanks! I love my veil so far :) And I got an email this morning that my dress came in, so I get to try it all on together this weekend. Yay!
ReplyDeleteI admire you trying the birdcage, haha. This was very simple, I imagine the birdcage will be much more difficult!